


Chapter XII. Small Boxes
Description
This section is from the book "Design and Construction in Wood", by William Noyes. Also available from Amazon: Design And Construction In Wood.
Chapter XII. Small Boxes
The size of such a box as is contemplated in this project is determined by its use. If it is for gloves it should be approximately 4"x5"xl2". If for men's handkerchiefs, about 6" square and 4" or 5" deep. If for stationery, then to fit the stationery. In any case, the only safe way is to measure the proposed contents and make the box to fit.
The wood suggested is mahogany or black walnut or oak, all strong, handsome woods. For the joints possible, see Handwork in Wood, pp. 187-190.
In refining the proportions, sometimes even a slight modification from the dimensions which mere utility requires will give a more pleasing effect. Looking at each outer surface separately it may be said that oblongs are more pleasing than squires, or looking at the box as a whole, that cubes or multiples of cubes are to be avoided.
For embellishment the modifications suggested are:
(1) Extended tops and bottoms, as in Fig. 185, No. 3, with the edges modified by moldings.
(2) A simple outline of inlay.
The main esthetic reliance, however, should be on good proportion, accuracy of workmanship, and beauty of finish.
The directions following are for the construction of a trinket box, 3" deep x4" wide x7" long, outside measurements, of stock 5/16" thick when hand dressed. Fig. 185, Fo. 4.
The material may be black walnut or mahogany, and the following pieces are required: 2 pieces ⅜'x3"x7⅛", 2 pieces ⅜"x3"x4", 2 pieces ⅜"x4¼"x7⅛".
(Or roughly speaking, a board ⅜' thick, 8" wide, and 20" long.) 2 brass butt hinges, 1", narrow. 8 brass screws ⅜' No. 2.
The grain of the wood in the four sides of a box should always run parallel, that is it should run either around the box or up and down. The reason is that with equal conditions of grain, any shrinkage that takes place will be even. In general the grain runs the long way of each piece. In this case of a long box, the grain should run around.
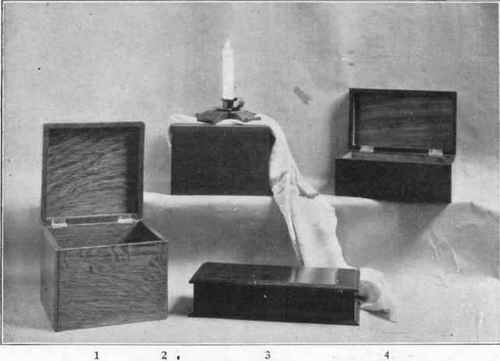
Fig. 185. Small boxes.
When not working on the pieces keep them clamped together in handscrews, (as in Fig. 5, p. 19) or at least keep them wrapped up in a paper to prevent them from uneven exposure and consequent warping.
In dressing up the pieces, proceed as follows: Cut from the wood, two pieces about 3¼" wide and 12" long. Each will serve for one side and end, and each is to be kept in one piece thru as many processes as possible. Plane up the working face, the working edge, one end, the width, 2⅞", and the thickness, 5/16". The width should be 3" if the top is to be put on with a double rabbet joint, Fig. 186 B.
To fix the length of the end pieces, from the dressed end of each 12" piece measure off 3¾", score all around with a sharp knife and a try-square, cut a groove for the saw, (Handwork in Wood, Fig. 91.) but do not cut off. First plow the rabbets.
With the rabbet-plane plow the rabbets, 3/16" deep and 5/16" wide, on what will be the lower inside edge of the sides and ends. This is to receive the bottom. For directions for rabbeting, see p. 72. If the top of the box is to be affixed with its full thickness showing, as in Fig. 186, A, no rabbet is cut on the upper edges of sides and ends. But a neater and stronger joint is the double rabbet joint shown in Fig. 186, B. If this is to be used, rabbet out the upper edges of the 12" pieces with a rabbet 3/16" deep and 3/16" wide.
Next saw off what will be the end pieces of the box and block-plane them true. Be careful that both ends are of exactly the same size, 5/16"x2⅞"x3¾", and all angles square. On both ends of each side piece, cut rabbets, (Handwork in Wood, page 179, No. 24) with the shoulders 6⅜" apart, the rabbet 3/16" deep, and let the surplus length remain for the present. It can be trimmed off after the box is put together. See Fig. 187.
Make these end rabbets as follows: Score and groove the shoulders with the try-square and knife- From this line score across the edges for approximately 3/16". With the marking-gage, gage on the ends and on the edges beyond the shoulders, a fine line, 3/16"' from the side scored and grooved. With the back-saw, saw in the groove down to the gaged lines. Remove the surplus wood with a chisel, being careful to keep angles square and surfaces flat. The squareness of the box depends absolutely upon the accuracy of this rabbet joint. The sides and ends may now be assembled. Start brads (⅞" No. 20) in lines ¼" from the ends of the box ends, as in Fig. 188.
Continue to:


My Books

