


A Scrap-Basket. Part 6
Description
This section is from the book "Design and Construction in Wood", by William Noyes. Also available from Amazon: Design And Construction In Wood.
A Scrap-Basket. Part 6

Fig.32. End of slat.
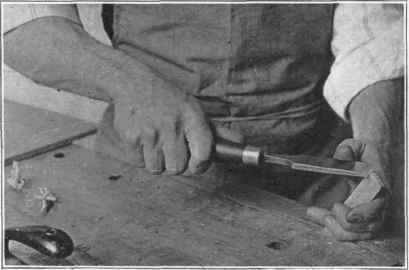
Fig. 33. Slicing off an arris with a chisel.
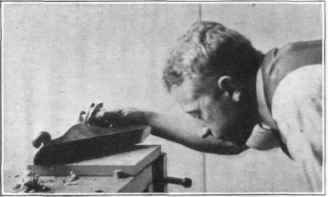
Fig.. 34. Testing a planed surface for flatness by using the arris of the plane.
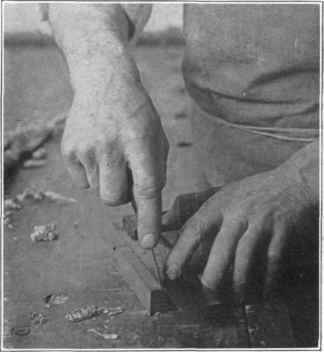
Fig. 35. Scoring with a knife along the try-square.
Cut off the corner A, as in Fig. 36, put the piece end up in the side vise, and plane off the end to the scored line. Test this end with the try-square, to see that it is square with both the working face and the working edge. Then measure exactly the length, 7/4", and score it with knife and try-square. Cut off the corner outside the width line, and plane up the other end. Plane the width, 7¼", to the ruled line. Use the try-square constantly for testing. The piece should now be perfectly square. To verify your measurement see that the diagonals are equal in length. AC = BD.
With the marking-gage set at ¾", gage from the working face both edges and both ends of the board. Now plane down the other broad surface to the line thus gaged, being very careful not to plane any portion too much. The best way is to plane off the high places first and then by working back and forth across the board to reduce the whole surface evenly. Stop when you have just split the gaged line.
VII. Making the frame. The next step is to get ready the frame, which binds the slats together near the top. From one of the pieces left from making the slats, dress up one piece, ⅞" thick, 1¾" wide, and 16" long. Smooth the two broad surfaces, taking as fine shavings as possible.
Plane true one edge of the piece, and gage a line 1¾" from the edges. Saw off the surplus and plane to the line. Now gage two lines, 5/16" from each broad face. Saw between these two lines, and plane up the rough surfaces. Each of the two strips should be 5/16" thick. Cut each of these in two crosswise in the center making 4 cleats. The pieces made thus far may now be sandpapered. Tear a sheet of No. 1 sandpaper into four pieces. An easy way to do this is to place it, sand down, so that the middle of the sheet lies along the front arris of the bench. With the left hand hold the part on the bench down flat. With the right hand holding the other half give a quick downward stroke which will tear the paper straight in two, Fig. 37.
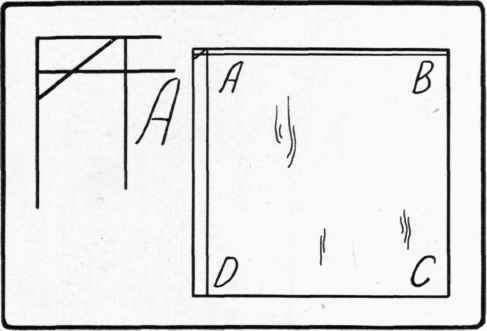
Fig. 36. How the working face looks when marked for planing end AB.
Repeat on each half. Fold one quarter neatly around a small block of wood (say 3" wide) and with this tool, sandpaper with the grain every surface of each piece, and also touch off the sharp arrises.

Fig-. 37. Tearing sandpaper.
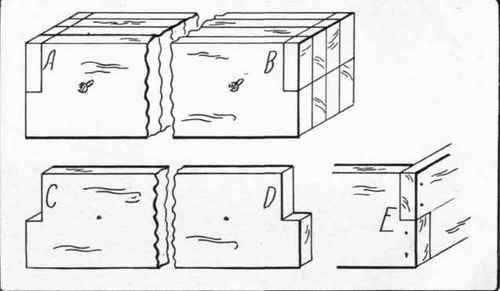
Fig. 38. Method of making and joining frame of waste-basket.
Villa. Making the frame (end lapped). First with a couple of brads (l ¼" No. 15) nail all four cleats together, keeping the sides and one end perfectly flush, and letting the heads project so that the brads can be removed later. Then saw them together in the miter-box to exactly the length of one side of the bottom 7¼" Next measure carefully 5/16" from both ends and draw a line half across on one surface, and connect with these lines two other center lines as at A B, Fig. 38. Place the bunch in the miter-box again, and saw on the outside of the lines A B, and carefully chisel out these returns. Take the cleats apart and each will appear as C D in Fig. 38. Now nail the four together into a frame, reversing two of them so that the projection of two of them will fit into the return of the next ones as E in Fig. 38. Nail both ways.
Continue to:


My Books

