


A Scrap-Basket. Part 5
Description
This section is from the book "Design and Construction in Wood", by William Noyes. Also available from Amazon: Design And Construction In Wood.
A Scrap-Basket. Part 5
Fig. 28. Gaged lines on piece to be sawed into slats. The saw-kerfs are to be in the middle of the ¼" spaces.
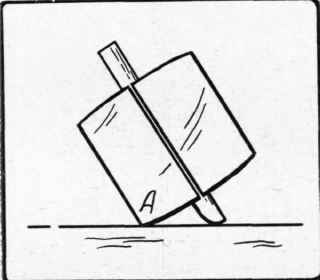
Fig. 29. How the beam of a marking-gage runs on its arris.
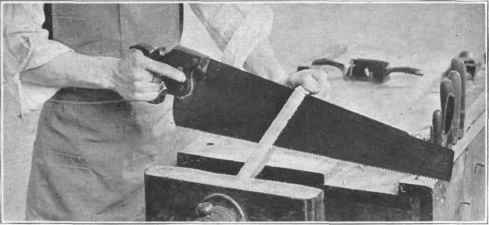
Fig. 30. Ripping with wood held in vise.
Saw about half way thru the board, then turn the other end up and saw the other half.
After sawing off the strip, put the board in the side-vise, sawn edge up, and plane it down to the next gage line, being careful not to go below it and yet to make the edge true. This is slightly more difficult than it was to plane it true in the first place. Then saw off another strip as before, plane up the edge of the board, and so on, until the necessary number of strips (28) have been sawn off. By this time one should know how to rip-saw well. By cutting 14 slats from each board, a part of each board will be left which should be saved to be used later for the frame.
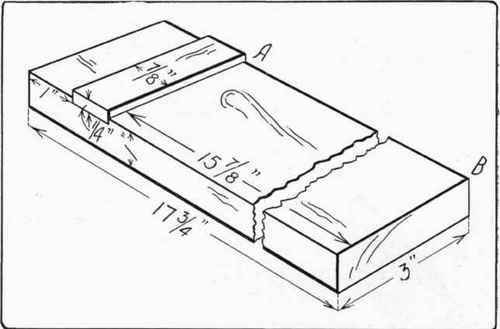
Fig. 31. Device for holding thin strips for planing.
V. Planing up the slats. The slats are now to be planed on the side still rough. If your bench has a tail vise, fasten one of the strips between the stop in the vise and the bench-stop, placed in that hole which is at the right distance, and plane it to the proper thickness. The same can be done between the vise-dog and the bench-stop in the Sheldon vise, but since the parts are of iron, special pains must be taken to prevent the plane cutter from hitting the iron. To avoid this danger, put in a temporary wooden bench-stop. Another device for facilitating the planing of these thin strips, is shown in Fig. 31 and can be readily made, as follows:
In any convenient piece of wood, 18" or so long, cut a dado ⅛" deep, and 1" from one end, just wide enough to hold tightly a thin strip of wood (say ⅞" wide). Let the distance AB be ⅛" less than the length of the strips to be planed up. Insert this device between the vise-dog and the bench-stop letting the strip to be planed lie in the space A-B. Raise the vise-dog so that it will engage the strip. Then tighten the vise just enough to hold it firmly. Plane up all the strips to the required thickness. If any are spoiled, as is likely to be the case, in this first project, make others, but save the spoiled ones until the basket is done.
Next trim off the arrises (corners) at one end of each of the slats, see Fig. 32. First mark carefully ⅛" from the end and then draw the diagonal with a sharp pencil and the sliding Tee-bevel. The neatest way to cut this angle is by slicing it off with a chisel, see Fig. 33. Cut these angles at one end only.
VI. Making the bottom. Inasmuch as the thickness of the original boards and hence the width of the slats may not be exactly ⅞", in order to find out the exact size of the bottom proceed as follows: Lay seven slats close together, side by side, measure their total width and add six times 3/16", (the space between the slats) or 1 ⅛" in all. The total is the exact size of the bottom. Let us assume that the slats are exactly ⅞" wide. Then the proper size for the bottom will be ¾" x 7¼" X 7 ¼" This is to be made next, and this involves broad surface planing. Fasten the board flat on the bench, between the tail-vise-dog and the proper bench-stop, the grain running lengthwise of the bench. If -the board is at all warped, plane the convex side first. Before beginning to plane, glance down the sole of the plane, Fig. 21, to see that the cutter projects evenly and but very little beyond the sole. Test the surface for flatness by placing the long arris of the plane on the surface in various directions, lengthwise, crosswise, and diagonally and looking toward the light, as in Fig. 34. If there are high places, plane them off first. Work carefully, planing only such parts as need it. When the surface is flat, plane over the whole surface from end to end, working from left to right, and back again until the whole surface is smoothed. Mark this surface with a single mark, thus: - . This indicates the "working face." Now plane one edge true and mark it with two marks, thus = . This indicates the "working edge." It is important to form early this habit of marking one's work. Next draw with a sharp pencil and a straight edge, a line 7¼" from, and parallel to the working edge. Since this distance exceeds the number of inches on the marking-gage, the most convenient method is to measure the distance near each end, and at right angles to the working edge, and then to rule a light line between these two points. Next score with the knife and try-square, as in Fig. 35, a line near one end of the piece. The working face will now appear as in Fig. 36.
Continue to:


My Books

