Fancy Skipping For Children. Continued
Description
This section is from "Every Woman's Encyclopaedia". Also available from Amazon: Every Woman's Encyclopaedia.
Fancy Skipping For Children. Continued
Fig. i. Introductory Position. This picture shows the position in which the child should stand before beginning to skip backwards. The heels must be together, with the feet in the first position, and the rope is in front just ready to be thrown backwards. The rope turns from the wrist, not from the shoulder. Be sure to tell a child this point, because most beginners try to twirl their arms and ropes from the shoulders like windmills, and consequently drag the rope upwards, so that it catches in their feet and seems too short.. The elbows should be drawn easily towards the sides, nearly touching the waist, and the handles of the rope held lightly, with the fingernails uppermost (see Fig. i).

Fif. 5. The polka step. In this movement, the rope passes under the feet at every alternate step danced in the rope. Each foot is "cut" twice
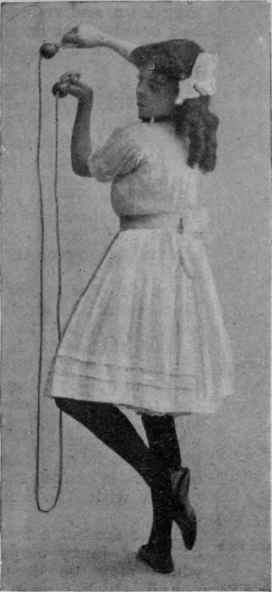
Fig. 6. The "cutting-up" step. A reel step
'o the knee and the dancer, as she turns, swings her rope down and round
Before letting a beginner throw the rope it is wise to make her start springing on both feet, exactly as if the rope moved too. She should try to keep her heels touching while springing, and the springs should be counted evenly - one, two - the first being the biggest spring. Two counts equal one circle with the rope. When the child has got thoroughly into the swing of the springing movement, and is landing on her toes without any sort of bump or jerk and with a slight bend of the knees, it is time to make her throw the rope over her head. Impress on the beginner the fact that the springs never cease because the rope is being thrown, for most babies do one movement without the other. The rope travels backwards, and comes out under the feet just as they are taking their first spring, and it is moving backwards again during the second small spring. This spring is taken in order that there shall be no pause between each movement of the rope.
A common fault with most children is to stop jumping with a jerk directly they feel the rope has passed under their feet. This must never be allowed, as it quite spoils skipping. If a child has difficulty in throwing the rope for itself stand in front of it, take the rope in the centre, making the child still hold the handles, and "drive " her, making her spring as if she were skipping. When she is springing properly, throw the rope sharply over her head backwards, and directly it touches the ground behind her heels, say "Jump," and draw the rope forward at the same time. This method helps the child to get the idea of jumping over the rope and of throwing it backwards, and in time it can be done without assistance.
The great thing is to achieve easy, unjerked skipping in a perfectly plain form without attempting any fancy exercises. Once a child is a really good plain skipper, and knows how to turn the rope easily, and also has got out of the habit of stopping between the springs, she will find no difficulty in doing all kinds of fancy steps with her rope.
Fig. 2. The Cross. This exercise does not involve any change of the feet or of the skipping movement, but is simply a position of the arms and rope. The exercise starts with two plain skips (the rope twice under the feet). Then, while the rope is being thrown over the head for the next skip, the arms are crossed, the right arm uppermost, and the rope is drawn over in that position, keeping the arms crossed on the chest, and bringing the rope forward by a twist of the wrists. Directly the rope has passed the feet the arms return to their original position, and the exercise is repeated, the left arm being crossed over the right. After a time two crosses (changing arms) may be done, without any plain skipping between.
Fig. 3. Round the Head. After two skips the arms are raised above the head, and the rope swung upwards and round in a complete circle from the wrists (see Fig. 3). This is done on the right and left side. Then the arms are lowered, and skipping begins again. The springing movement of the feet continues while the rope is thrown round the head.
to forward skipping by checking the rope in front and throwing
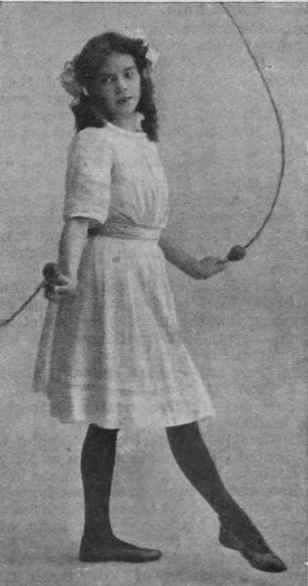
Fig. 7. Checking step. In this a change is made from backward under the feet instead of over the head
Fig. 4. Spring and Hop. This exercise allows each foot to be raised from the ground in turn for two beats. On the first it is lifted ; on the second it remains suspended, while a " hop " is made on the other foot (see Fig. 4). The rope passes under each foot in turn, with the other lifted.
Fig 5. Left to Right. The polka step may be danced from side to side (left to right) in the rope. The rope passes under the feet at every alternate step. This is a more difficult exercise, and needs practice.
Fig. 6. " Cutting-itp " Step. This is a reel step danced in the rope. Each foot is "cut" twice to the knee, and on the fourth time, with the left foot raised, the dancer turns, swinging her rope down and round, and opening her arms as she faces front again.

Fig. 8. Toe to toe. The right toe against the lift, the rope coming under both feet
Fig. 7. Checking Step. This illustrates the change from backward to forward skipping, which is made by checking the rope while it is in front and throwing it under the feet first, instead of over the head.
Fig. 8. Toe to Toe. This exercise starts with the right foot against the toe of the left foot while the rope is in the air ; then the right foot is extended, as in Fig. 4. while the rope comes under the feet. The exercise is then repeated with the left foot.
These are but a few of many fancy steps which may be done with a skipping-rope, and which may be mixed together to form a long exercise.
Continue to:
My Books

