


Lanterns. Part 3
Description
This section is from the book "Design and Construction in Wood", by William Noyes. Also available from Amazon: Design And Construction In Wood.
Lanterns. Part 3

Fig. 200. Method of clamping up the parts.
For gluing the panels together, prepare a few forms of the shape shown in Fig. 203. Put a thin film of glue (liquid glue will do) on those edges of the panels which are to be jointed, and with small brads, (1" No. 18) nail the panels in place to the half hexagon bottom. Clamp the panels together with small handscrews, using the forms just made. See Handwork in Wood, p. 171, Fig. 258, and p. 170, 2nd paragraph. When dry, clean up.
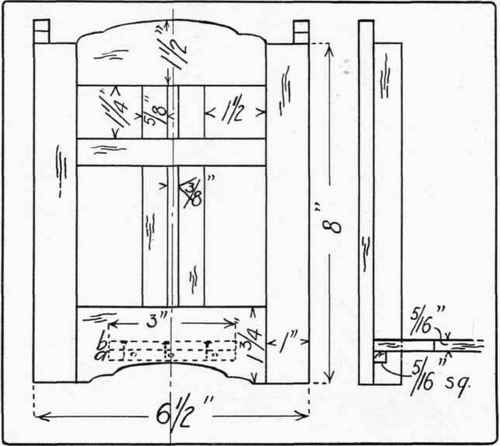
Fig. 201. Working drawing of lantern shown in Fig. 196.
The frame should be stained and finished before the stencils are put on. Hence it is better to make the bracket next, so that all the staining may be done together. See below for directions for making the bracket.
The stencils are cut out of sheets of brown paper which fit the insides of the panels. (See p. 152.)
Cut three pieces of silk of the same size as the stencils, and of an harmonious tint, and tack both paper and silk, (silk toward the candle) to the inside edges of the panels by means of thin strips of wood and small brads, say ¼", No. 20. Tack these strips all around the inside of each panel.
The shelf of the bracket should conform in design to the lantern. The material for the bracket may also be 5/16" thick. If possible make all the parts, shelf, back, and two supports, out of one board, planing first the working face and working edge, and the exact thickness. Lay out the plans on this and cut out roughly. The shelf overhangs the back when assembled. The back and shelf can now be finished exactly to shape by means of the plane, or if irregular in shape with the spokeshave and chisel also. In order to make the two supports exactly alike, glue them together thus: Put a touch of glue at several points on one piece, press a piece of paper over it, put glue on the other side of the paper at the points opposite those already glued, lay on the other piece and clamp together. When dry, proceed as if they were one piece, finishing carefully. When shaped, they may be pried apart with a chisel, and what little glue adheres may be planed off. Or, the two pieces may be handscrewed together, while they are shaped. Assemble the parts of the bracket as in Fig. 204 First draw light pencil lines on the top of the shelf and on the back of the back, to indicate where the brads (1" No. 18) are to be driven into the supports, start two brads along-each of these lines, driving them thru the boards until the points prick thru, and also driving brads thru the shelf to go into the back.
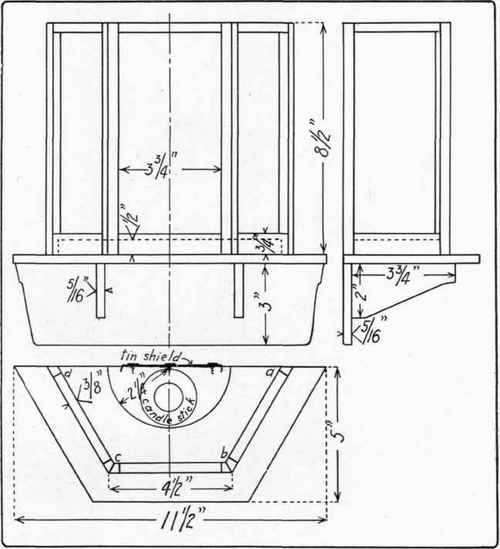
Fig. 202. Working drawing of lantern shown in Fig. 198.

Fig. 203 Block for clamping lantern panels together.

Fig. 205. Methods of hanging the bracket.
Now, holding one of the supports in the vise, lay the back on it in its proper place and drive in the brad nearest the shelf. By means of the try-square hold the back exactly in place over this support, and drive in the other brad. Repeat with the other support.
Next brad the shelf and back together, having the shelf overhang the back. See that the supports are squarely in place and drive home the brads thru the top into them. Stain the bracket to match the screen.
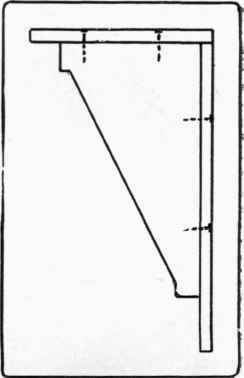
Fig 204. Location of brads.
For hanging the bracket, gain into the back small copper or brass strips with holes in them, as shown in Fig. 205, or insert small screw-eyes (No. 214½) at the back edge of the shelf. Place these hangers so as not to interfere with the screen.
If electricity is available it is of course much safer to have a small electric light bulb take the place of the candle.
Continue to:


My Books

