


How To Make Hanging Book Shelves
Description
This section is from the book "Furniture A Girl Can Make", by William W. Klenke. Also available from Amazon: Furniture A Girl Can Make.
How To Make Hanging Book Shelves
Although this model is called "hanging book shelves," you will find it equally convenient to use in the kitchen for holding spice boxes, cookbooks and the like.
An old discarded packing case that is made of 1/2" thick lumber will do very nicely for this job.
The sides should be about 5" wide and 25" long. The length you make the shelves will depend upon your own personal conditions and requirements and just where you intend placing these shelves.
Method Of Procedure
Step No. 1: Lay out the two side pieces according to the design shown. Mark off where the shelves are to come on both pieces at the same time—a right and left side.
Step No. 2: Cut out the outline and make smooth with sandpaper.
Step No. 3: Cut out three shelves with square ends and of the proper width.
Step No. 4: Thoroughly sandpaper all surfaces with No.1/2 and No. 00 sandpaper. To insure flat surfaces free from waves and other irregularities, fold the sandpaper over a scrap block of wood while sandpapering. The final sandpapering, however, should be done when the job is assembled and with the sandpaper held in the palm of the hand. Slightly round all sharp corners. Before applying the finish as directer, thoroughly clean off the sawdust with a soft brush.
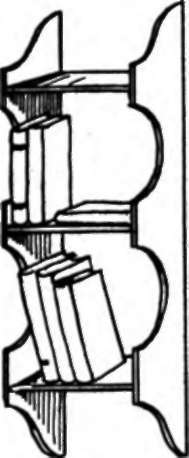
Step No. 5: Assemble the job by screwing the sides to the shelves with 2-11/4" No. 8 round head screws at each joint.
Step No. 6: Finish this project in a brilliant color of lacquer or paint. First apply a thin coat of white shellac to the entire job (thin with alcohol). When dry, rub down gently with No. 0 sandpaper; follow this with either lacquer or paint as you may desire, following the directions on the can.
A pleasing effect can be obtained by striping the edges of the two side pieces and the shelves a darker color.
Another very interesting way to finish these shelves is to cover the outside of the two side pieces with an attractive wallpaper. Select a small figured paper or one with a design of narrow stripes. If you select this finish for your model, you should apply the paper before putting the job together. First apply a thin coat of white shellac to the parts that are to be papered (thin the shellac with alcohol) ; then apply a coat of any prepared glue to the wood, after which the paper is worked in place, smoothing out all wrinkles carefully. When the paper is thoroughly dry, apply a thin coat of white shellac to the wallpaper and follow this with a slightly heavier coat of shellac. The remaining part of the model should be painted in a color to harmonize with the paper. Do this painting also before you assemble the project, which is easily accomplished, as the sides are fastened to the shelves with screws.
Continue to:


My Books

