


How To Make A Bench Hamper
Description
This section is from the book "Furniture A Girl Can Make", by William W. Klenke. Also available from Amazon: Furniture A Girl Can Make.
How To Make A Bench Hamper
If you are somewhat crowed for room and do not know just where to keep your soiled clothes, then you will appreciate this "bench hamper," for, as its name implies, it is both a bench and a hamper for soiled clothes, decorative as well as useful.
The size you make this model will depend upon the space you can give up to this piece of furniture in your room, and also the amount of clothes you intend putting in it. One measurement you should adhere to is the height; make this not over 19". A little less would be better.
The kind of material you use for making this model will depend upon the finish you desire. If a painted finish or one that is to be covered with some material such as wall-paper, cretonne, etc., then you need not be so particular about the kind of wood you will use. If you want this project finished to imitate mahogany, walnut, etc., then you should be choice about the lumber you select. Use good white wood or other close grained soft wood that is easy to work and will take stain well.
Use 3/4" thick wood for the two ends and top and thick wood for the sides and bottom. If you use plywood, thickness is sufficient for the sides and bottom.
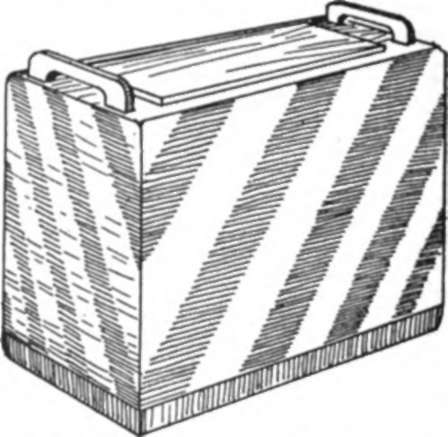
Method Of Procedure
Step No. 1: Cut out the pieces for the ends, sides, bottom and top. The top piece is made so that the cover section can be lifted up, so cut out an open space in the top piece. Then make a separate cover with strips nailed around on the bottom sides to prevent the cover from sliding off.
Step No. 2: Glue and nail the sides to the end pieces; then the bottom to the ends and edges of the side pieces. Be sure that the job is square and rests flat on the floor.
Step No. 3: Shape out two handles for the top and screw these handles to the top from the under side. Now glue and nail the top in place. Use finishing nails for all this work (nails with small heads) and sink the heads below the surface of the wood to allow for puttying.
The cover, as already explained, is made to fit into the cut out portion of the top.
Step No. 4: Many different finishes can be used for this project. A washable wallpaper or oil cloth in a striped design is very effective. You may choose instead to paint the model in a striped design as shown. In either case, first apply a thin coat of white shellac to the model (thin shellac with alcohol) ; then proceed to paste the paper on, or paint, as you may wish. If you choose to paint this hamper, first apply a coat of paint mixed with one-half turpentine and one-half raw linseed oil and just a little drier. The second coat should be flat paint (no oil) and the final coat an eggshell enamel. Color, of course, can be added to all coats if you so desire.
Continue to:


My Books

