


Chapter II. Before You Start Sawing
Description
This section is from the book "It's Fun To Build Things", by W. T. R. Price. Also available from Amazon: It's Fun To Build Things.
Chapter II. Before You Start Sawing
Strange as it may seem, the first thing you need to know before you start building anything is just what you are going to build, and how you are going to build it. Many people overlook this, and find that they have to go again to the lumberyard because they didn't get quite enough lumber. Or they cut so many pieces too short that they need some more lumber to play with. The best procedure is to make some sort of a drawing, the more nearly accurate the better, measure the place the thing is supposed to fit, and figure all the pieces a little long, so that you will have enough to spare when you come to square-up ends.
In measuring it is important to measure accurately, or you might as well guess at your measurements. Accuracy is one of the main ideas of measuring. Be sure your folding rule is completely opened up. People have been known to leave two of the sections unopened, with a resultant short measure and considerable mystification.
It is important to think and plan in measurements, whether you are fitting shelves to a closet or recess, or whether you are building a piece of standing furniture. First you make a rough free-hand sketch.
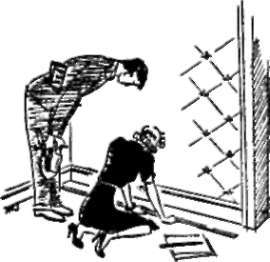


The making of bookshelves in a recess.
(Let us suppose the condition is a recess between a chimney and a wall.) Then you measure it. The best thing to do is to make a simple scale drawing, so we might as well find out what one is, and how it is made.
Drawing to scale, as architects do, merely means assuming a small unit to equal a large one, as for instance 1 inch equals I foot (written 1" = 1' 0"). At this scale, 6" in the actual piece of work would be 1/2" on your drawing, 3" in the actual work would be 1/4" in your drawing-and so forth. Here is a 1" scale drawing of a book 8" high, standing in a shelf which would take a 9" book:

An actual scale for making drawings at the scale of one inch to a foot. Application shown at right.
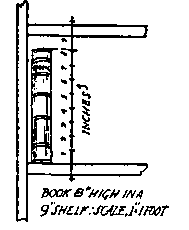
Thus you see that the 8" book measures 8/12" on your drawing, and the 9" shelf measures 3/4" on your drawing. An architect's scale rule makes it easy to draw things to scale, because, among other scales, it carries 1" (equaling 1' 0") divided up into twelfths, each one of which is a miniature "inch" on your drawing. These miniature "inches" are even divided into halves and quarters. In case you aren't ambitious enough to get a scale rule, here is a 1" to 1' 0" scale, which you can use by carefully marking off the divisions on the edge of a card. Down to 3" you can use an ordinary 12" ruler, because an actual 1/4" equals three of the miniature "inches" and 1/2" equals six of the miniature "inches." Below that you are dealing in twelfths of an inch, which are not marked on an ordinary ruler. Now consult the scale drawing on the page facing, here shown reduced down to 1/2" equaling 1' 0", instead of 1" equaling 1' 0".
As a matter of draughtsmanship, certain methods of showing construction must be understood in order to more easily "read" the illustrations. A ragged, "broken" end on a piece of wood simply means that the end is broken off in the drawing in order to show more clearly some otherwise concealed detail. A shaded section of a piece of wood usually means that a cut has been made in the drawing (not in the actual work)-also for greater clarity. Dotted lines are employed to show conditions or construction which would otherwise be invisible.
Returning to the shelves we started to build in the corner between the chimney-breast and the wall, 8" shelving is wide enough for ordinary books, with 9" or 10" for larger books. (Shelving over 8", especially in clear white pine, is naturally more expensive.)
It would be unwise to rest the shelves on cleats nailed into the wall, because you can never be sure of getting a good, secure nailing, just where your cleat is to go, and you can always be sure of cracking a lot of plaster. Whether this be in your own house, a rented house, or an apartment, it isn't a good idea.
The next illustration shows various details of the technique in the building of shelves which are backless. The inevitable base-board in any room is always in the way when you are making built-in stuff. The best thing to do is to build above it, as the sketch shows. Use a front-board to avoid creating a dust-pocket under your bottom shelf. This will also look better since it carries the effect of the base-board around the room.
If you cut your lumber to very accurate measurements, you may build the shelves in such a manner that they will wedge in so tightly in the space that they will have no tendency to tip away from the wall. This is difficult to do, not only in itself, but because most plaster walls are not exactly true, and while your shelves may fit in some places, they will not fit in others. The simplest thing to do is to drive three or four 2" wire nails into the plaster, through one of the side supports.
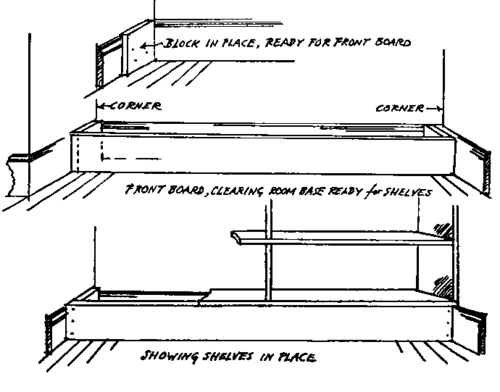
Three early stages of the shelf project, in which a base is built.
To support the shelves, two methods are suggested. Cleats, even small ones, look awkward, and the neatest job is to drive four 2" wire nails through the side pieces into the shelves. (There's a technique to this, as shown in a moment.) Another method, in which your shelf boards are loose, is to rest each end on two large, heavy screw-eyes- screw-eyes with a head about 3/4" in diameter. These are amply strong and will not show, unless you look up under the shelves.
Continue to:


My Books

