


Cone Pulleys Pattern
Description
This section is from the book "Amateur Work Magazine Vol3". Also available from Amazon: Amateur Work.
Cone Pulleys Pattern
This is a much more difficult pattern to make as it is to be built up from three blocks, is more difficult to turn, and requires great care in molding. Fig. 15 represents the shape of the finished casting, the hole G being drilled out after the casting is made. The right end view in this figure is a half section drawing showing the three pieces from which the pattern is made. Do not forget the necessary allowances for finish and shrinkage, and in turning this pattern be very liberal with the draft allowance, particularly with the surface enclosing the spaces at E and F, Fig. 15. A is the top surface of the pattern when molded, and the arrow indicates the direction in which the pattern is drawn from the mold. The spaces at E and F in the finished casting are left by a green sand core, formed as part of the cope, and right here let me say that I assume that the pattern maker has carefully read my article on "Simple Castings in Type Metal," which appeared in a previous issue of Amateur Work. I shall use the terms cope, nowell, etc., as defined in that article, many times in describing the next few patterns.
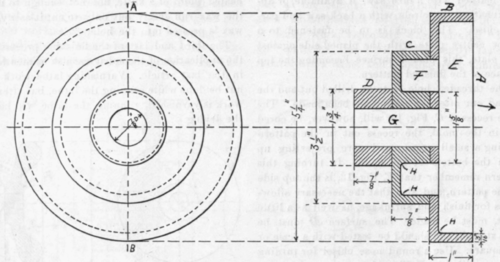
Fig. 15. Cone Pulley. finish all over.
This pattern is to be built up from three blocks, B, C, D, Fig. 15, planed true on both sides to the thicknesses as given below. The block B should be planed to 1 1/4" in thickness cut round, 5 5/8" diameter. The block C should be planed to 1 1/16 in thickness cut round. 3 7/8" diameter. The block D should be planed to 1 1/16 " in thickness and cut round to 2" diameter. Using hot glue, fasten the pieces together, being sure that each is carefully centred, and clamp in a vise to dry. The block D may also be fastened to C with 1 1/2" No. 16 wire brads, care being taken to drive these brads straight, after which set in the heads 3/16" with a nail set.
The glued block when thoroughly dry is to be fastened to a screw centre plate, the surface A, Fig. 15, coming against the plate. The outside surface of the pulley is then turned, care being to keep the shoulders straight and to give the belt surfaces the necessary draft. Having finished the turning of the outside surfaces, sandpaper them carefully and remove block from screw centre plate.
The pattern is next to be chucked, the chuck preferably holding the pattern at the surface C. This will require a chuck about 2 1/4" in thickness. The chuck is fastened by screws to a face plate. Care must be taken in cutting the recess which is to receive the pattern, not to get it too large. In turning the surfaces enclosing the spaces at E and F, Fig. 15, notice that small fillets are to be turned as indicated in the figure at H. These surfaces which, as previously stated, will require a liberal allowance for draft should be very carefully sandpapered. The pattern is then to be finished as previously described.
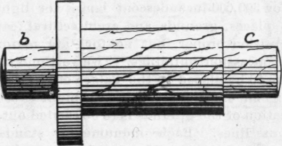
Fig. 16. Pattern With Core Prints.
In a previous article I have spoken of the green sand core, and shall now briefly describe baked sand cores, first giving the following standard definition of cores by Rose: "Cores are projecting bodies of sand, either left in the mold by the pattern itself or else made in a separate device called a core box. They are placed, after being dried, in position in the mold. . The purpose of a core of the latter description is to leave a hole or recess of such a peculiar shape that it is impracticable to make the mold of the necessary conformation by the use of the pattern alone. The use of these cores also permits us to modify the shape of a pattern that would otherwise be difficult to mold."
When it is not possible then, Or when it is not convenient to have the cores left by the pattern, they are formed in separate devices called Core Boxes. The core box is considered as a part of the pattern or patterns with which it goes, the pattern and core box together forming a set. In
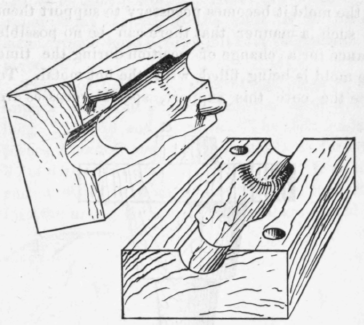
Fig. 17. Core Box.
Fig. 16 is shown a pattern having core prints at B and C The core box for making this core is shown in Fig. 17, and the mold with the core in place is shown in Fig. 18.
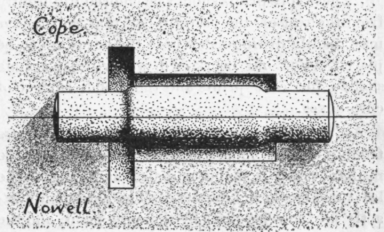
Fig. 18. Mold With Core.
When a large number of standard cores of the same size are required, as, for instance, the small round cores used in-making holes through the hubs of pulleys, and in other works of a similar character, metal core boxes are often used.
Core Boxes require just as much care in the making as do the patterns, and just as much attention must be given to their shape, durability and finish. The shape of the pattern is usually very nearly like that of the required casting, except that it may have no holes or openings in it. The openings in the core box resembles the openings in the casting.
Continue to:


My Books

