


Shop Kinks And Short Cuts. Continued
Description
This section is from the book "Do It Yourself With Aluminum. 125 Projects For The Home Craftsman", by G. W. Birdsall. Also available from Amazon: Do It Yourself With Aluminum.
Shop Kinks And Short Cuts. Continued
To cut off lengths of tubing, rod, bar, or special shapes on a bench saw, clamp a 1" x 4" wood board to the miter gauge of the saw so that it supports the work on both sides of the cut as in Fig. 2-11. This helps prevent jamming by keeping the entire length of material in line till the saw cut has been completed. When working with tubing, be sure to grip it tightly to prevent the saw from rotating it when starting the cut.
Any type of circular saw blade is well suited to cutting aluminum. However, always remember to advance the metal into the saw slowly and evenly. While it is entirely practical to make long, heavy cuts in aluminum, as when ripping bar or angle sections, it is important to avoid continuous cutting with a heavy feed. This heats up the saw-blade tips and causes them to pick up aluminum particles which partially weld to the blade.

Fig. 2-13.
To prevent such metal pickup, stop the feed intermittently and allow the blade to run unloaded for a short time to keep it cool. Also, while the blade is at rest, lubricate it and the teeth with a paraffin block or old candle to reduce friction. Check the set of your saw if it tends to bind after lubricating.
If the saw drags when making a heavy cut, stop it and inspect the blade. Remove any aluminum particles sticking to the teeth by flipping off with a knife or screwdriver. A wire brush is also excellent for cleaning saw teeth. Then reduce your rate of feed to avoid "leading up" the teeth again.
When jig-sawing aluminum sheet, a thin piece of wood under the aluminum helps obtain a smooth cutting action. Where a number of pieces of sheet are to be cut to the same outline, stack cutting on a band saw is preferred. Nail five or six sheets of aluminum of the required size to a scrap piece of 1/4" plywood. Mark out the cut desired on the top sheet, and get your outline by sawing down through the entire stack.
For such work, always lubricate the saw blade thoroughly with paraffin or wax from a candle before sawing. This will stop chatter and eliminate much friction and drag.
Planing Edges
After cutting sheet with shears or a saw, use a small wood block plane or the larger type (Fig. 2-12) to trim the edge or to get a straight, square-cut edge. Do-It-Yourself Aluminum will not damage the plane. A light cut will produce best results.
An ordinary wood jointer-planer (Fig. 2—13) does the same job much faster. For hand planing, clamp the sheet between two pieces of wood to support the edge as in Fig. 2-12. When using the jointer, a scrap block of wood is helpful in holding the sheet edge squarely into the cutter blades.
After ripping angles or bar stock with a saw, it is always desirable to smooth the rough saw cut. A standard jointer-planer handles this work well with no danger to the cutters, as Do-It-Yourself Aluminum will not damage the sensitive blades. Do not take more than a fine cut. To remove more metal, repeat the cut. Use a push bar to advance the work slowly and uniformly without getting your fingers too close to the cutters.
Drilling
Use ordinary wood bits for Do-It-Yourself Aluminum. When working with a portable electric drill, center-punch the exact location desired to prevent the drill point from "traveling" before it bites into the metal. The drill must be held perfectly perpendicular to the surface, or it will tend to drift sidewise when drilling comparatively heavy sections such as bar, rod, angle, or tubing.
Chatter enlarges the hole diameter, causes drifting, and produces an irregular hole. Avoid chatter by lubricating the drill point with thin oil ... . 10W or 20W auto oil thinned slightly with kerosene.
Fig. 2-14.
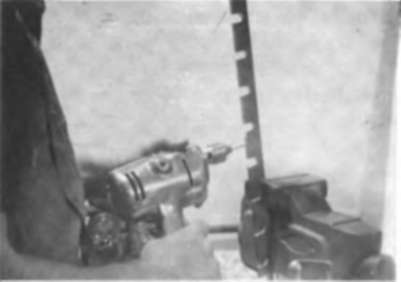
Lubrication is especially important in deep drilling on a drill press. Flood freely when attempting small deep holes as when drilling the holes edgewise through the 1" bar to make the tool rack (Fig. 6-5.)
To drill such holes without lubrication, mount the work in a vise so that the metal particles tend to fall out of the hole as shown in Fig. 2-14. Back the drill out frequently to clear the hole.
Do all drilling in aluminum at high speed, the maximum obtainable on your equipment. However, apply light feeds to avoid excessive burrs, chatter, and drifting.

Fig. 2-15.
An ordinary push drill will make holes in aluminum but is not recommended. Instead, use a rotary-type hand drill, a portable electric drill, or a drill press.
Excessive feeds, failure to lubricate properly, or simply failure of cut metal particles to clear out of the hole will cause the drill point to pick up metal which will partially weld to it. To prevent this, use light feeds, back out the drill frequently to clear the hole, and lubricate freely so flutes will clear metal particles from the hole.
Welding is evidenced by failure of the drill to advance under continued uniform pressure. If this happens, remove the drill from the hole. Shut it off. Clean off any metal particles from tip and in the flutes. A wire brush will usually work fine. If welded tightly, loosen with knife blade or screwdriver.
In all drilling, clamp work securely to prevent drill from twisting it. This is an important safety precaution, regardless of type of drill used. Figure 2-15 shows a convenient way to clamp angle sections for drilling, using a piece of scrap wood under the angle.
High-speed steel drills cut cleaner and stay sharper longer than carbon-steel drills. Power wood bits of the type shown in Fig. 2-16 drill 1/8 "x 3/4" and 1/4" x 1" bar easily, providing a pilot hole is first drilled for the tip.
An ordinary brace and bit cuts holes cleanly in sheet aluminum when backed up with a scrap of wood. First punch a hole clear through the metal for locating and starting the lead screw on the tip of the bit. Hold bit steady and perpendicular to the metal surface so the bit will cut the sheet cleanly on first contact. The bit will remove a circular section of metal (Fig. 2-17).

Fig. 2-16.
Cut larger holes in the same manner, using an expansion bit, a circle cutter, or gasket cutter of size desired.
Minimize burrs on edges of drilled holes by using light feed pressures in all drilling. When using a portable power or hand drill, wobbling the drill slightly after penetrating the metal will often remove burrs. Otherwise, use a hand countersink for removing burrs. Or take a larger size drill and use it as a countersink under finger pressure alone.
Countersinking aluminum rod, bar, or angle permits "invisible" riveting with finished rivet heads flush with metal surface (Fig. 4-1). Use an ordinary wood countersink bit in an electric drill, brace, or a drill press. Lubricate for best results. For utmost precision, clamp work in vise under drill press and use depth stop.
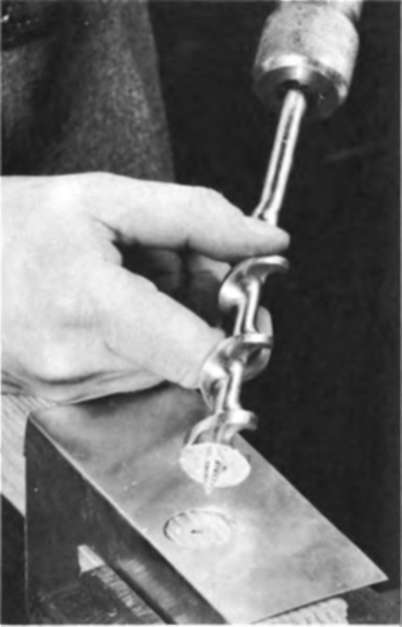
Fig. 2-17.
Punching holes instead of drilling is highly recommended when joining sheet-metal parts with self-tapping screws. Place the sheet over a block of soft wood with the end grain up. Punch with a sharp nail .... or use an ice pick.
The value of a punched hole over a drilled hole is that it provides more metal to engage the threads of the screw. This makes possible a much stronger connection.

Fig. 3-1.

Fig. 3-2.
Continue to:


My Books

