


Projects For The Dining Room. Continued
Description
This section is from the book "Do It Yourself With Aluminum. 125 Projects For The Home Craftsman", by G. W. Birdsall. Also available from Amazon: Do It Yourself With Aluminum.
Projects For The Dining Room. Continued
Recommended Sequence Of Finishing Operations
Sand the Nov-A-Ply table surface perfectly smooth and level. Seal by brushing on two thin coats of transparent wipe-on type "plastic finish." Stain and seal side and end rails. Then assemble to table. Install bar edging. Finish entire table witli two coats of transparent wipe-on type plastic finish, wiping on heavy coats. Rub lightly between coats. Result will be clear, glasslike finish. Apply finish over aluminum bar as well as wood surfaces. Clean the aluminum thoroughly with fine steel wool, rubbing in lengthwise direction only, before applying finish. Be careful to avoid fingermarking the aluminum.
Clean and brighten the aluminum legs by rubbing lengthwise with fine steel wool. To retain brilliance and avoid finger marking here, apply light coat of paste wax and polish with clean dry cloth.
Gadget Shelf (Fig. 8-4) is made from embossed sheet, using your own design ideas for outline. Size depends upon space you have available. Unit shown is 6" wide, 6" high, 2" deep, with two shelves. Back and two sides are of one piece of sheet, with sides bent up 90°. Each shelf is a separate piece of sheet cut to width desired and here about 11/2" deep with a 1/2" flange turned up at front edge.
No bolts or rivets are used, as slots and ears hold the shelves in place. Make ears about 1/4" wide and 1/4" long; round off corners. Cut slots with screwdriver blade and hammer on hardwood block. Assemble by inserting ears in matching slots and bending over (see Fig. 4-4).
Fig. 8-5.
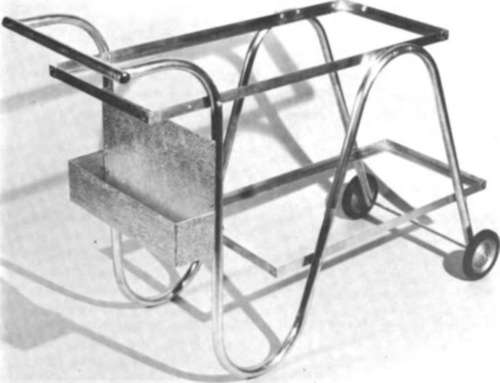
Serving Cart {Fig. 8-5) is an exceptionally useful item. Frames for both upper and lower glass shelves are made from 1/8" 3/4" x 3/4" angle. Top frame is 36" long; bottom 30". Both are 18" wide. Cut and miter corners. Use riveted outside splice plates for corner joints (Fig. 4-35). Bend the 3/4" tube framing on 9" radii per Fig. 3-27 and accompanying instructions. Two pieces of tube go into each side frame, the two pieces being joined end to end with wood dowel rod per Fig. 4-63. Join tube and angle members with through bolts.
For bottle holder, cut and bend up a sheet of embossed aluminum as in Fig. 8-6. First cut out the square corners shown solid. Then fold 180° the flanges numbered 1, 2, 3,4, and 5. Then make 90° bends at 6, 7, and 8. Flanges 1, 2, and 3 are folded back; flanges 4 and 5 folded up. Make bends 6, 7, and 8 in the "up" direction, also.
Obtain wheels at local cycle shop or make them from plywood. Attach with 3/8" rod, per Fig. 4-84. For the glass shelves, use double-weight window glass. Cover edges with clear Scotch tape by centering tape strip over edge, pressing down equal amounts on each side of glass. Use two layers of tape to provide proper cushion for glass.


Fig. 8-7.
Storage Table (Fig. 8-7) is 30" high, 15" front to back, with lower shelf 8" above floor and upper box section 9" deep. Of course, these dimensions can be varied as you wish. Use 1/8" 3/4x 3/4" angle for the four legs. That is all the aluminum necessary, unless you wish to use two additional pieces of the 3/4" angle as stretchers between the legs to hold the shelf at each end. In this case, cut stretchers and rivet to legs at corners. Remainder of table is 3/4" plywood. Make sliding doors per Fig. 4-82.
Make and assemble table box section first. Then screw legs to box and rivet legs to stretchers (if used). Fit shelf in place. Attach handles to doors, and insert sliding doors in travel slots.
Collapsible Table {Fig. 8-8) has top of 3/4" plywood, edge trimmed with 1/16" x 1" x 1" angle per Fig. 4-50. Use 1" tube for the legs. Hinge legs at top by bolting to 3" T-type hinges set 45° into each corner so legs will fold toward center of table. Corner braces are 3/8" rod cut 36" long. Bend rod on 1" radius in exact center as shown in Fig. 8-8. Bend a 2" length at right angles on each end to swivel against underside of table top. Fasten to table top with straps made of 3" lengths of 1/8" x 3/4" bar placed crosswise the rod ends. This allows rod braces to fold against underside of table.

Fig. 8-8.
Note close-up "A" of rod brace to tube-leg connection made with 3" length of 1/8" x 3/4" bar, shaped as shown and fastened to leg with self-tapping screws or through bolts.
Bar or Server (Fig. 8-9) is a design that will be found most easy to construct. Upper "box" section of 1/2" plywood is 12" high with interior divided into two shelves for 16" of its length. Bottom shelf here is 10" deep. Note that face slopes to match slope of front legs.
Lower "box" section of plywood is 16" deep, same length as upper section, 26", and 14" high, with sliding Masonite doors, per Fig. 4-82. A perforated Masonite panel between the two box sections offers a means for hanging can and bottle openers, ice pick, straws, and mixer sticks.
Fig. 8-9.

Cut back legs 64" long. Place lower box section face down on floor (pad to avoid marring). Position back legs 2" in from ends and so top of box will be 30" above floor when unit is set upright. Bolt through tubes to back of box section to attach legs. Now attach upper box section in a similar manner. Position so top of legs will be 2" below top of box when upright.
Next cut perforated Masonite panel to fit between back legs and lap over both boxes at least 1", and screw to boxes. At this point, turn entire assembly over so back of boxes is toward floor. Now cut and fit front legs as shown in Fig. 8-9. Note that upper end of front legs extends under box section to which it is attached with bolts. See tube-bending instructions accompanying Fig. 3-27.
Construct lower shelf frame from 1/16" x 1" x 1" angle to outside measurements of 26" x 14", with corners per Fig. 4-37.
Use a single 8' length of angle, or splice in a piece in the back if 6' length is used. Cut and fit shelf of double-weight window glass, covering edges of glass with clear Scotch tape before inserting in frame to avoid glass-to-metal contact.
Planter, at rear in Fig. 8-10, is 14" long, 4" wide, 2" deep, with :54" diameter curls around all four top edges. Make from a single plain sheet, 21" long, 11" wide, notched in ;at each corner, as shown in Fig. 3-7 for making box sections. Cut sheet and notch it; then make curls (Fig. 3-11) and finally the 90° bends. Corners are not locked but left open. Planter is made waterproof by using a piece of heavy-duty aluminum foil as a liner.
Planter legs are in pairs, each pair a U-shaped piece made by curling down each end of a 4" x 8" piece of plain sheet. Rivet to bottom of planter. Polish with steel wool, and apply wax or lacquer.
Ash-tray Set, at extreme right in Fig. 8-10, consists of six 3" diameter circles cut from plain sheet, grained in sections per Fig. 5-8. Then form scallops around edge as in Fig. 3-9. Flower designs are easily scratched or etched into the surface. See Chap. 5 on Surface Finishes. The holder for the tray set is made like the trays except that 1/2" x 11/ears are left opposite each other, then curled up to form clips.
Fig. 8-10.
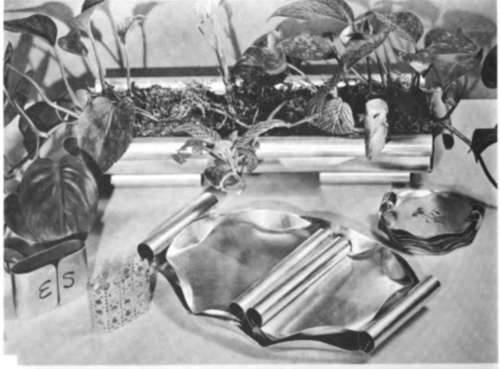
Candy-dish Set, foreground in Fig. 8-10, consists of three pieces. The tray underneath the other two is a single piece of plain sheet 8" wide, 16" long. The 21/2" on each end is cut down to form a diameter curl 31/2" long (see Fig. 3-11).
Cut remainder of material to an oval outline, and put three large scallops into each edge as shown.
Cut each of the two smaller dishes from a 6" x 71/2" piece of plain sheet. Lay out a 6" diameter circle on one end, and reduce the other end from 6" down to 5" by making two lines each 1/2" in from the side, up to meet the circle. Cut this outline, grain the circle in sections (per Fig. 5-5), and curl up the other end to meet the circle, using a 3/4" dowel rod.
Napkin Rings, left foreground in Fig. 8-10, are simply 2" x 8" pieces of plain or embossed sheet formed to an oval and initialed if desired.
Continue to:


My Books

