


Indoor Shooting Games
Description
This section is from the book "How To Build Games And Toys", by B. W. Pelton. Also available from Amazon: How To Build Games And Toys.
Indoor Shooting Games
At an early age the young male of the species will acquire some sort of a shooting iron, either makeshift or "boughten." He will never be completely satisfied, however, until his gun shoots something at something. In order to beat the gun, to coin a phrase, adult discretion can easily provide a harmless weapon and a suitable target for young Nimrods of both sexes, which will not only satisfy the urge to shoot something down, but will furnish a competitive skill game subject to the vagaries of chance and observation. As indicated in C and D of Figure 5.7, the element of luck is introduced by rotating a disk behind the target after each shot, thus changing the hidden numbers behind the scoring apertures.
The gun. The stock and handguard are cut and shaped from f-in. stock according to diagram A; they are joined together by two faceplates which should be not less than 1/4 in. thick. The barrel is a 17-in. length of f-in. dowel with a 4-in. section 1/4- to f-in. deep cut off the rear end, so that it can be attached to the top of the handguard with countersunk screws. The muzzle end is horizontally notched to receive the end of a rubber band.
As indicated in B, the trigger mechanism consists of a common spring clothespin. Unsnap the spring and attach one wooden section to the inclined face of the stock with two small countersunk screws, as indicated by dotted lines. Make saw kerfs in the underside of the stock and handguard for the insertion of a piece of old alarm clock spring or other metal for the trigger guard. Then lay out the two pieces atop one of the cheekplates, try out the movable half of the clothespin for clearance, and mark the positions on the cheekplate, which should be attached with plenty of countersunk screws. Then fasten the opposite cheekplate in place, insert a rubber band in the muzzle notch, and test the releasing action of the clothespin trigger. In case the inside inclined surface of the stock was cut at too erect an angle, or insufficient clearance was allowed for the movable half of the trigger to release the rubber band "bullet" even after gentle sanding, the rubber bands can be wound with thread near one end to produce a ball or bulge, which can be gripped by the jaws of the clothespin for easy release.
Shape and smooth the stock and handguard, then stain, shellac and wax. Paint the barrel, cheekplates, trigger, "hammer," and butt plate with aluminum or very dark blue paint. A sling made from a school strap may be added if desired.
The Target
Referring to C, Figure 5.7, it will be noted that the front of the target is laid off on a piece of plywood 30 in. square. To lay out the series of 2-in. holes in concentric circles without benefit of compass, first draw light diagonal lines connecting the corners. Through the central point thus established draw lines connecting the centers of the top and bottom, and the two sides, making eight equal triangular sections. Mark each line 11 in. from the center point and, in addition, mark each diagonal 5 1/2 in. from the center. At these twelve points bore 2-in. holes with an expansive bit, after first cutting an inch off the top edge of the target (see dotted line). These holes are the target windows. Bore a hole for a bolt in the center of the target.
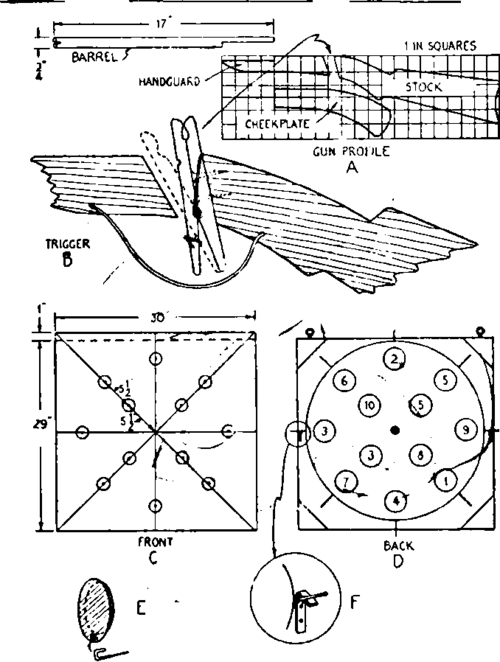
Fig. 5.7. Rubber band gun and target.
In front of each "window" a 3-in. circular target disk cut from tin is swiveled on a cup hook which passes through a hole drilled 1/4 in. above the bottom edge. As indicated in detail E, a second hole holds the target disk erect on the horizontally bent arm of the cup hook, which is then screwed into the target board 1/4 in. below the lower edge of its window. There must be sufficient clearance so that when the target disk is hit, it will be pushed in and fall clear of the short arm of its hook, swiveling down by its own weight to disclose the circular window and its score.
The large pivoted disk behind the target need not be circular and can be of any thickness which will hold wire nails in its edge, or can be cut out to form spokes; laminated cardboard will fill the bill when stiffened by sufficient layers. Diagram D of Figure 5.7 uses a disk 3/8 in. thick cut on a 14-in. radius, with thin finishing nails studded in the eight radii.
After this rotating disk has a hole bored through its center for the pivot bolt, it can be lined up under the target front as a stencil, and the window openings marked on it lightly in pencil. Repeat the process on the reverse side, then paint the outlined openings white or in various light colors, and number them in any sort of mixed-up sequence, so long as the mixture is different on both sides. Numbers cut from a large calendar will simplify the job.
Detail D shows one of the pair of thin metal spring stops, such as can be cut from a discarded brass-edged ruler. The triangular corner pieces should be thick enough to keep the bolt end clear of the wall. The bolt should be long enough to pierce both the target front and the rear rotating disk, with room for a washer on both sides of the disk before the locking nut is added. Screweyes in the edges of the top triangles will permit the target to be hung on the wall with the pivot bolt on a line with the eyes of the average shooter. If it is propped up on a chair, it should be as nearly erect as possible, and two books will be needed under its bottom edge to afford clearance for the protruding nail spokes. Enamel the target white and the tin target disks red, or any contrasting color combination.
To commence the game, spin the rear rotating disk a couple of times and bring it to a neutral position where only blank spaces appear behind the target windows. Then adjust the tin targets in their upright, masking positions over the windows, and turn the rear disk until a nail "spoke" appears vertically above the top of the target, and the disk is locked in position. When players become too familiar with the sequence of scoring numbers, unbolt the rear disk and reverse it so that a new sequence must be memorized.
Continue to:


My Books

