


Chapter II. Projects For One Hand Involvement. Metal Foil Repousse Picture
Description
This section is from the book "Handcrafts For The Homebound Handicapped", by Mildred Kroll Rich. Also available from Amazon: Handcrafts For The Homebound Handicapped.
Chapter II. Projects For One Hand Involvement. Metal Foil Repousse Picture
Materials And Supplies
copper, brass, or aluminum foil, 6" x 8", 36 gauge 20 3/8" copper or brass escutcheon pins liver of sulphur (lump, size of a pea) colorless nail polish, or clear metal lacquer 3/8"plywood, 7"x9" picture hanger, linen type paper newspaper or paper towels fine sandpaper
Scotch tape fine steel wool tracing paper
Tools
non-writing ball point pen pencil with attached eraser pair of scissors ruler hammer
THESE instructions are for making a wall plaque of the clown using copper metal foil. Brass or aluminum foil may also be used. Metal foil tooling or repoussage may have other uses besides pictures. It is possible to cover any wooden article such as book ends, letter or jewelry boxes, and lamp bases with tooled metal foil.
The word repousse is derived from the French verb repousser meaning to thrust back. Repousse work or repoussage in English means the art or process of hammering out or pressing thin metal from the reverse side. Repoussage is the noun, and repousse is the adjective.
Procedure
1. If you prefer, create your own design the desired size on tracing paper. Otherwise copy the design of the clown which follows by placing the transparent paper over the picture and using pencil. Attach the tracing paper to the metal foil at the corners with Scotch tape. Notice that the clown design is composed principally of large mass areas rather than fine detail. Place the paper covered copper on 1/4" thickness of newspaper or paper towels. Using a non-writing ball point pen, retrace the design on to the copper using moderate pressure. Check the design on the wrong side of the copper to make sure you have traced all the lines. Remove the paper from the metal foil.
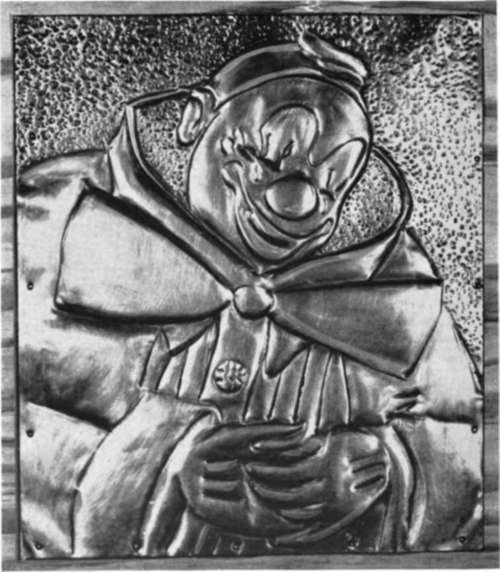
Figure 1. Copper Repousse Clown.
2. Place the copper face down on the pad of paper. Use the eraser end of the pencil and, with a downward rubbing action, push out the different portions of the design. The nose and lips should be pressed out more than the cheeks and ear. Similarly, the bow tie is pushed out more than the shirt or collar, and the hands and the cuffs are deeper than the shirt. Examine your work frequently from the front to see if the desired raising has been reached.
3. ;Setting back is the next operation. This is the smoothing out of the flat areas which may have become buckled during the raising operation. Rest the foil, face up, on a smooth hard surface such as the table on which you are working. With the ball point pen go over the outside lines of the design. At this time it would be risky to outline the nose again, for example, because it would make the cheeks buckle.
4. ;To add further to the decorative effect, the background will be stippled. Place the copper right side up on the paper padding. With the ball point pen tap out the background and the inside of the collar.
5. ;Rub the surface lightly and briskly with fine steel wool until the metal is bright and free from discoloration. Use half a glass of warm water, place the liver of sulphur the size of a pea into it, and wait until the sulphur dissolves and the solution becomes lemon colored. Apply the solution to the right side of the copper with a small rag. The copper will become black. Allow it to dry thoroughly. With fine steel wool polish to desired highlights. Wash and dry it using hot water and soap. Do not touch the face of the copper with your hands because fingerprints or grease from them will mar the finish. Preserve the copper with a coat of colorless nail polish or clear metal lacquer. If desired add a second coat only after the first is completely dry.
6. ;Smooth the edges and face of the plywood with fine sandpaper. Measure the picture against the wood. There should be an even border of wood showing all around. It may be necessary to trim the copper foil to fit the wood evenly. Hold the metal in position and nail one escutcheon pin in the middle of each side. Working from the center to the edges on the short sides, nail a pin half way between the first pin and the corners. On each of the long sides, nail two pins equally distant from the center pins. Finally, nail in the four corner pins. It is best to work the pins as directed because it prevents wrinkles or bulges in the finished product. Attach the picture hanger at the back top center. Use colorless nail polish or clear lacquer on the wood to preserve the finish.
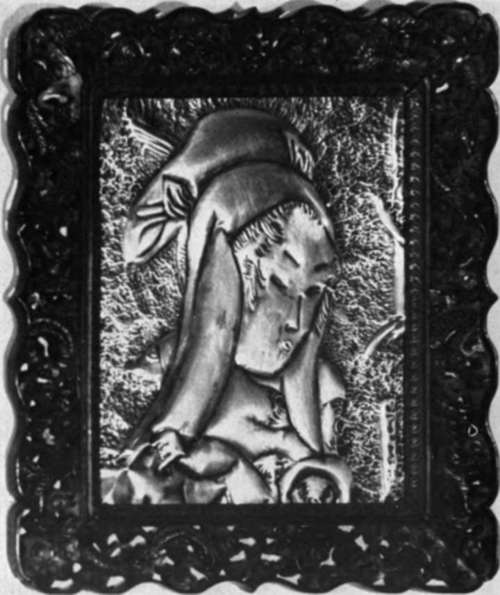
Figure 2. Copper Repousse Geisha Girl.
Continue to:


My Books

