


Needlework. Part 2
Description
This section is from the book "Arts And Crafts In The Elementary School", by Joan Dean. Also available from Amazon: Arts And Crafts In The Elementary School.
Needlework. Part 2
Draw on paper a line AB which is a quarter of the total waist measurement. (Page 100, Fig. 1.) Draw a line AC at right angles to AB. The length of AC is the measurement from the shoulder at the neck to the waist (plus about one inch). (Fig. 2.) This length may be slightly greater at the back than at the front. If the difference is more than a couple of inches, it may be wise to make separate back and front patterns.

Fig. 1.

Fig. 2.
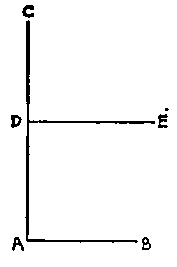
Fig. 3.
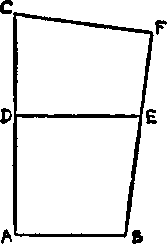
Fig. 4.

The bodice pattern with the neck and armholes cut out.
At a point D which is a little above half-way up the line AC, draw a line DE at right-angles to AC. The length of DE is a quarter of the chest measurement. (Fig. 3.) Join BE. Draw a line from C, which slopes slightly downwards from AC. Continue the line BE to join this line at F.
Cut this out. This is your pattern for the bodice.
For the present we will leave the hollowing of the armhole and neck. Use this pattern to cut a second pattern out of newspaper. This is really a trial run for cutting material. The paper should be folded, the pattern pinned into position, using the paper as economically as possible, and both back and front cut out. Make an allowance all round for seams. "We now have darts on the pattern and on the finished bodice a newspaper version of the whole bodice. This should be fitted on to the child for whom it is intended and pinned together. We soon see that it doesn't fit in some places, and so we discover that it is necessary to cut away some paper at the neck and at the armholes—in fact, it will probably have torn already. When this has been done, the newspaper bodice should be unpinned carefully, and folded in half. Lay it on top of the original pattern and use it as a guide to cut away paper for the arm-holes and neck. Now fold the material and place the pattern in position, remembering to arrange it so that no material is wasted. Place it so that the straight of the material is in the right place. Put in as many pins as are needed, and cut out. Remove the pattern and fit the bodice on to the child. It still does not really fit. This is because the material needs to be further shaped with darts. These are pinned in, as in the diagram. Now it is difficult to take the bodice off, so we must plan openings and fastenings. We examine the fastenings on the clothes we are wearing and discuss the rival merits of snap fasteners, hooks and eyes, zips and buttons. We decide which are going to be the most suitable and where they must go. The bodice is now ready for sewing and if the school possesses a machine, this is a good opportunity for its use. The actual sewing is of secondary importance in this kind of work. The materials we are using do not warrant careful work, and if we emphasize this aspect of the work too much, it will become long-winded and tedious. If the clothes are actually used for dressing up, as they should be, deficiencies in the sewing will soon make themselves felt.
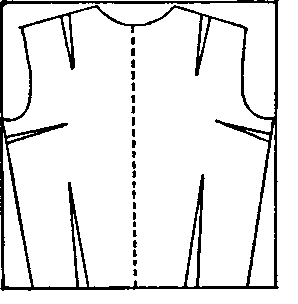

The position of the front bodice.
Inset sleeves are rather difficult, though not impossible, to treat in this way. It may be easier to plan work with magyar sleeves to begin with. On the other hand, it is useful if children become familiar at an early stage with the shape of the sleeve and the measurements which govern it, even if the work that results is not very good. First discuss with the children the measurements they will need to make a sleeve. These are:
Length from the top of the shoulder to the wrist.
Length from the underarm to the wrist.
Distance round the arm at the wrist.
Distance all round the arm at the armpit. If we look at the clothes we are wearing, we shall see that the sleeves on blouses and dresses are not made skin-tight. A little extra material is allowed at the wrist, and rather more as the sleeve widens. Estimate how much this is, and add it to the two "round the arm" measurements. Now we can draw the pattern as follows:
Draw a line AB which is the distance round the wrist plus the extra allowance already mentioned. (Fig. 1.) Draw a line CD which meets AB at right-angles at its mid-point. CD is equal to the distance from shoulder to wrist. (Fig. 2.) Measure from the point C a distance along the line CD equal to the measurement from the underarm to the wrist. This is point X.

Fig. 1.

Fig. 2.

Fig. 3.
At the point X draw a line at right-angles to CD, arranging it so that CD crosses it at its mid-point. This line, EF, is equivalent in length to the distance all the way round the arm at the armpit, plus the extra allowed. (Fig. 3.) Join AE, BF. If we look at the tops of the sleeves we are wearing, we shall notice that they are curved. Notice the shapes of the curves. Using this knowledge, draw in the curved top of the sleeve. (Fig. 4.) Once again it would be wise to cut the sleeve in newspaper and to fit it, so that any mistakes can be seen and rectified before the material is cut. When the sleeve has been cut in material, the underarm seam may be sewn and the bodice and sleeve tried on inside out, so that they can easily be pinned into position ready for sewing. Tell the children to notice where the seam comes in the clothes they are wearing and to see that the seam in their work comes in about the same place.

Fig. 4.


Continue to:


My Books

